Box Model

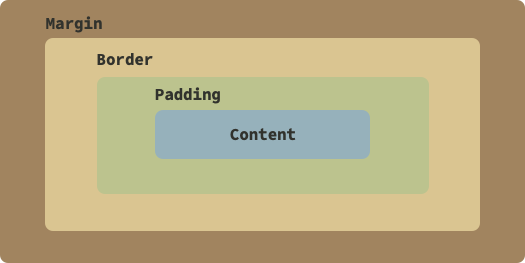
Now we will learn about the CSS box model. Essentially, every element on your webpage is a box that consists of margin, border, padding and the actual content.
Content is your actual content in center of everything. After that you have transparent padding before the border. After padding, you have border which can be set to different kinds of colors and types. After border you have the final part margin which can be used to set transparent area outside the border.
Essentially, the box model allows us to define border and spacing between elements.
Learn more about the box model.
Padding

Padding is the space before your boxes border. Value for the padding is usually set using length like px (pixels) or procentually using the percent % sign.
Padding can be set using the css property padding or padding-top, padding-right, padding-bottom, padding-left. The padding property is a shorthand for combining all of the latter properties into one. By defining just padding: 20px all your corners would have 20 pixels of padding. By defining padding: 20px 10px 5px 0px you would set these paddings for top, right, bottom, left individually.
Margin

Margin is the space after your boxes border. Value for the margin is usually set using length like px (pixels), as auto (browser calculates the margin amount) or procentually using the percent % sign.
Margin can be set using the css property margin or margin-top, margin-right, margin-bottom, margin-left. The margin property is a shorthand for combining all of the latter properties into one. By defining just margin: 20px all your corners would have 20 pixels of margin. By defining margin: 20px 10px 5px 0px you would set these margins for top, right, bottom, left individually.
Border

Border is used, like it states, to create a border for your element. Border can have different width, style and color.
Like with padding and margin, you can set the border individually and using the border-top etc... definitions. The syntax for the border is:
Examples:
border: 2px solid black /* Sets black 2px solid border around the element */
border-bottom: 1px dotted red /* Sets red 1px dotted border in bottom of the element */
Border can have multiple different styles and browsers can render them little bit differently. Normally we just use the default solid style. To read more about borders and their styles, refer to this article.
Exercises

Setting Up
To setup for these exercises, create this kind of file. Note that the styles will be applied internally in head section of the page:
box_model.html:
<!DOCTYPE html>
<html lang="en">

<head>
  <meta charset="utf-8">
  <title>Box Model Exercises</title>

  <style type="text/css">
    .box-1 {

    }
  </style>
</head>

<body>
  <h1>Box Model</h1>

  <section>

    <div class="box-1">Box 1</div>

    <div class="box-2">Box 2</div>

    <div class="box-3">Box 3</div>

  </section>

  <article>

    <p class="text-1">"Lorem ipsum dolor sit amet, consectetur adipiscing elit, sed do eiusmod tempor incididunt ut labore et dolore magna
    aliqua. Ut enim ad minim veniam, quis nostrud exercitation ullamco laboris nisi ut aliquip ex ea commodo consequat. Duis
    aute irure dolor in reprehenderit in voluptate velit esse cillum dolore eu fugiat nulla pariatur. Excepteur sint
    occaecat cupidatat non proident, sunt in culpa qui officia deserunt mollit anim id est laborum."</p>

    <p class="text-2">"Sed ut perspiciatis unde omnis iste natus error sit"</p>

    <p class="text-3">"At vero eos et accusamus et iusto odio dignissimos ducimus qui blanditiis praesentium voluptatum deleniti atque
    corrupti quos dolores et quas molestias excepturi sint occaecati cupiditate non provident, similique sunt in culpa qui
    officia deserunt mollitia animi, id est laborum et dolorum fuga. Et harum quidem rerum facilis est et expedita
        distinctio. <span class="text-3-span">Nam libero tempore</span>, cum soluta nobis est eligendi optio cumque nihil impedit quo minus id quod maxime
    placeat facere possimus, omnis voluptas assumenda est, omnis dolor repellendus. Temporibus autem quibusdam et aut
    officiis debitis aut rerum necessitatibus saepe eveniet ut et voluptates repudiandae sint et molestiae non recusandae.
    Itaque earum rerum hic tenetur a sapiente delectus, ut aut reiciendis voluptatibus maiores alias consequatur aut
    perferendis doloribus asperiores repellat."</p>

  </article>
</body>

</html>
Examples
Example 1:
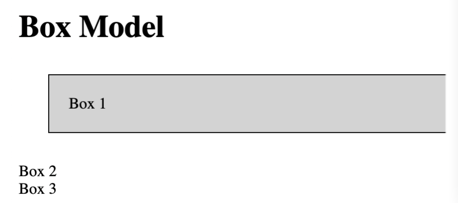
Let's first view how our box model behaves. Add the code below. Notice that div elements have display set to block by default which takes up all the space on width it can and they start on new lines.

Example 2:
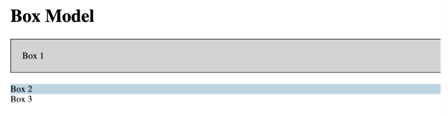
Let's add some spacing between our two divs:
.box-1 {
  background-color: lightGray;
  padding: 20px;
  border: 1px solid black;
  margin-bottom: 20px;
}

.box-2 {
  background-color: lightBlue;
  margin-top: 20px;
}
Challenge:
Highlight and separate the second paragraph from the two others by:
- Adding background-color yellow to it
- Adding 15px padding to top and bottom of it.
Width & Height
Width and height are the basic properties that you can use to set the exact size of your element. The property names are width and height and values are usually set in some length dimension like px (pixels) or using percentage %. Width and height does not work for elements with display CSS property set to inline (like span).
Example 1: Setting Width and Height
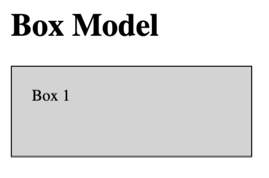
Setting the first box as 200px width and 50px height.
.box-1 {
  background-color: lightGray;
  padding: 20px;
  border: 1px solid black;
  margin-bottom: 0px;
  width: 200px;
  height: 50px;
}

Example 2: Width and Height for Second Box
Setting the second box to same 200px width and 50px height.
Both boxes now have the same width and height but they are still sized, why? Because width and height properties do not care about borders and padding, they set the element to specified width and height, discarding the padding and border settings.
Example 3: box-sizing CSS property
As seen above, if you want to adjust your element to be exactly the width and height you want to, you would need to reduce or add the borders and paddings for your element. However, we have one more cool CSS property on our sleeve that can help us adjust the width and height to be exactly the value that you want to: box-sizing. Read more about box-sizing.
.box-1 {
  background-color: lightBlue;
  margin-top: 20px;
  width: 200px;
  height: 50px;
  box-sizing: border-box;
}
Example 4: Inline Elements
As mentioned above, you cannot apply width and height for inline elements. For example, try adding width and height for your class text-3-span:
In order to change width and height for that element, you could change it's display property to inline-block or block.